Step 11 - “Hello” GDB demonstrated in 5 parts
In the previous post, we were able to get the appropriate “pre-checks” done for GDB/pwndbg. We trudged through the steps necessary to get GDB/pwndbg correctly aligned with steps to get a better debugging experience. This three part post will briefly examine the “hello” binary in GDB/pwndbg and then go through each line step-by-step in GDB/pwndbg. This is blog post 11, part 1 of 5, of post x in the learning with DVRF project series.
Part 1: Set debugger to debug!
- Log into the VM
- Open up a Terminal
- In the Terminal window with Qemu, press the up arrow to re-run the Qemu launcher:
- In another Terminal window, browse to the buildroot directory and launch objdump:
cd
cd buildroot/buildroot-2016.05/output/host/usr/bin
./mipsel-linux-objdump -d /home/andy/Downloads/DVRF-master/Firmware/_DVRF_v03.bin.extracted/squashfs-root/pwnable/Intro/hello - We can use the output from objdump above to make sure we have the appropriate hex address to set a breakpoint. As reference, we can see that 004007b0 is the hex address for <main>:
- In the Terminal window that we used for objdump, let’s launch gdb-multiedit:
gdb-multiedit - At this point, we should have Qemu emulating the “hello” binary in a MIPS environment in one Terminal window with a GDB stub in a waiting/blocking mode. In another Terminal window, we should have GDB/pwndbg running. To think about it more, we have our host system (e.g. this Mac) running VMware which is running a x64 Linux OS which is then running Qemu to emulate a MIPS environment. Interesting.
- In pwndbg, we need to set our target. In pwndbg, type in:
target remote 127.0.0.1:1144 - Let’s set the path to the “hello” binary with the “file” command. In pwndbg, type in:
file /home/andy/Downloads/DVRF-master/Firmware/_DVRF_v03.bin.extracted/squashfs-root/pwnable/Intro/hello - In GDB, we need to should set the path to our shared library. In pwndbg, type in:
set solib-search-path /home/andy/Downloads/DVRF-master/Firmware/_DVRF_v03.bin.extracted/squashfs-root/lib/ - Let’s verify that with the corresponding show command. In pwndbg, type in:
show solib-search-path - Let’s verify that the libraries are loaded with the symbols loaded. In pwndbg, type in:
info sharedlibrary - We can see that we do have the symbols of the functions within uClibc loaded:
- We did not compile the binary with debugging information, so this warning is to be expected
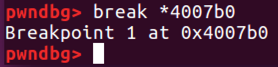
- Let’s set the breakpoint to the main entry point with the appropriate address. In pwndbg, type in:
break *4007b0 - At this point, we should really be ready to actually do step-by-step debugging of “hello” with the appropriate corresponding C libraries.


No comments:
Post a Comment