We are getting pretty close to setting up a package that can be assessed successfully in the SWAMP! Things we may take for granted in a virtual machine are not things we can always assume will work in an automated online platform. For example, if we need additional tools in our virtual machine, we can easily download/install/compile/etc whatever we want. However, in highly controlled environments like the SWAMP, we have to play in the sandbox they provide.
Going back to the error, the error at the bottom in the previous post is pretty helpful. Let’s take a look at the error again:
make[1]: *** No rule to make target `Ssh.bin', needed by `install'. Stop.
Going back to the error, the error at the bottom in the previous post is pretty helpful. Let’s take a look at the error again:
make[1]: *** No rule to make target `Ssh.bin', needed by `install'. Stop.
make: *** [scard-install] Error 2
We see the make command referencing “scard-install” which is helpful, but not obvious at this point. If we look at the start of the “Standard Error” section in the failure report, we see these lines:
FILE: build/configure_stderr.out from out/build.tar.gz
We see the make command referencing “scard-install” which is helpful, but not obvious at this point. If we look at the start of the “Standard Error” section in the failure report, we see these lines:
FILE: build/configure_stderr.out from out/build.tar.gz
config.status: WARNING: 'Makefile.in' seems to ignore the --datarootdir setting
config.status: WARNING: 'scard/Makefile.in' seems to ignore the --datarootdir setting
If we look at the top of the failure report, we see two “build” lines and should examine both lines.
config.status: WARNING: 'scard/Makefile.in' seems to ignore the --datarootdir setting
If we look at the top of the failure report, we see two “build” lines and should examine both lines.

Toward the end of either build line, we see this:
With all of this information, we have better clues to help us figure out what’s going on.
Section 1: Where do we start
- Let’s take a look at the files we have. Browse to the directory holding the expanded contents of OpenSSH with our custom “configure.ac” from earlier.
- Browsing through the folder contents of our custom OpenSSH 4.3 we can see a folder named “scard”
- Open up the “scard” folder
- Interesting, there’s a “Makefile.in” file in here along with “Ssh.bin.uu”
- At the top of this post, the error references “Ssh.bin”. However, we can see that in this folder we see a very similar file ending in “.uu”. It was the 80s, all files ended in “.uu”. What? No.
- If we search on the internet to what kind of files end in “uu” you may find this Wiki article:
https://en.wikipedia.org/wiki/Uuencoding - Basically it’s a compressed file that was compressed with “uuencode”. To make the file not end in “.uu” we need to use “uudecode”. The “uuencode” and “uudecode” programs are in the RPM package “sharutils” you can read more about here.


Section 2: Make it not compressed
- Let’s take a look at that “Makefile.in” file. Open it up in a text editor.
- Thankfully this file isn’t too long and is straightforward
- As we can see, there are different sections. In a nutshell, we could use “make” to run different parts of this file. We saw in the “build” lines at the top of the failure report:
“make ; make install”
These were the “make” instructions where this process failed - The process specifically failed during the “make install” part because:
make[1]: *** No rule to make target `Ssh.bin', needed by `install'. Stop. - As we saw earlier, there is no “Ssh.bin” file unless we use uudecode. However, we see in this “makefile” that we if we do “make distprep” it will run uudecode on the “Ssh.bin.uu” file.
- Adding sharutils to the VM would help us out (which by default in the SWAMP, RHEL 6.4 does not have it installed). But, we can add it! Quick, back to the SWAMP!

Section 3: Is this going to work now?
- Log into the SWAMP
- Click on “Packages”
- Click on the modified package, in our case, it’s OpenSSH blog2
- Scroll to the bottom and click on the version number. In our case, it’s “4.3”.
- Click on “Build”
- Scroll to the bottom and click “Edit Build Info”
- Scroll to the “Build settings” section
- Add “make distprep; ” before “make install” as below
- Scroll to “Package dependencies” and click “Add New Dependency”. You may need to click this button twice to get this new window to pop up.
- In the window, change the platform to “Red Hat Enterprise Linux 32-bit” and enter in “sharutils” for the dependency as below
- This will tell the VM to add in this package so we can use uudecode in the “make distprep” part of the build process
- Click “OK”
- We can see the updated build script process as below
- Click “Save Build Info”. You may need to click this button twice.
- Click “Details”
- Click “Run New Assessment”
- Change the platform to “Red Hat Enterprise Linux 32-bit”
- Click “Save and Run”
- Check the box if you want email notifications and click “Run Now”
- Click “OK” in the notification window
- The assessment process may take a little bit more time as we’re asking the VM to do more work, but we’re getting closer to a successful build! Wait, this won’t work?
- Unfortunately, there’s one last error to deal with
- Click on the “!” for the Clang line to open up the failure report
- Scroll to the bottom of the failure report
- The error above is a permission problem. Since we’re in a VM and don’t know what kind of capabilities there are, let’s install this in /tmp instead to see if that alleviates permission problems.
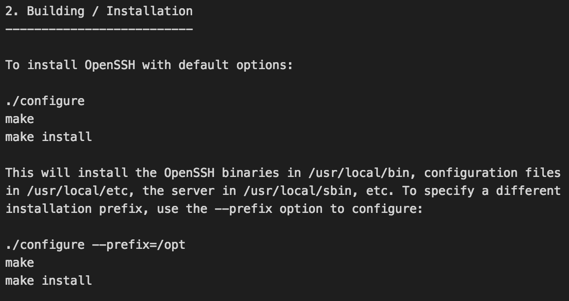
- If we look at the “INSTALL” file from the OpenSSH directory, we see the following information
- If we want to install OpenSSH into an alternate directory, we need to specify configure with the “prefix” argument and a path such as “/tmp”. Let’s do that!


Section 4: One last thing to change
- Go back to the packages screen in the SWAMP
- Click on our modified package, in this case is “OpenSSH 4.3 blog2”
- Click on the version, in this case is “4.3”
- Click on “Build”
- Scroll to the bottom and click on “Edit Build Info”
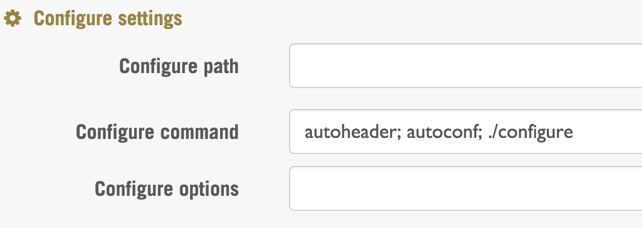
- Go to the “Configure settings” section
- Add in “ --prefix=/tmp” after “./configure” as below
- Our new build process should look like this
- Click “Save Build Info”. You may need to click this button twice.
- Click on “Details”
- Scroll to the bottom and click “Run New Assessment”
- Change the platform to “Red Hat Enterprise Linux 32-bit”
- Click “Save and Run”
- Check the box if you want email notifications and click “Run Now”
- Click “OK” in the notification window
- Let’s wait for our SUCCESSFUL assessment to complete!
- You can click on the “finished” links to see the results of each tool. We will cover the data from this assessment in another post and go over the findings from each tool and bug viewer.


No comments:
Post a Comment