We will start with preparing the environment. We're going to use CentOS 7 for the OS and the OWASP Juice Shop project for the web app to exploit. This series assumes you already have VirtualBox installed, but I would imagine that VMware would also work fine as well.
- Go to the downloads page for CentOS here
- Click on "DVD ISO" and download the ISO which should automatically pick a download mirror closest to you. At the time of this writing, CentOS 7, x86_64 1708 was used.
- Start VirtualBox and click "New"
- Type in "JuiceShop" as the name, change the type to "Linux", and select "Red Hat (64-bit)" as the Version.

- Click "Continue"
- Change the RAM to 2048 (or higher if you can) and click "Continue"

- Leave the default option of "Create ..." and click "Continue"
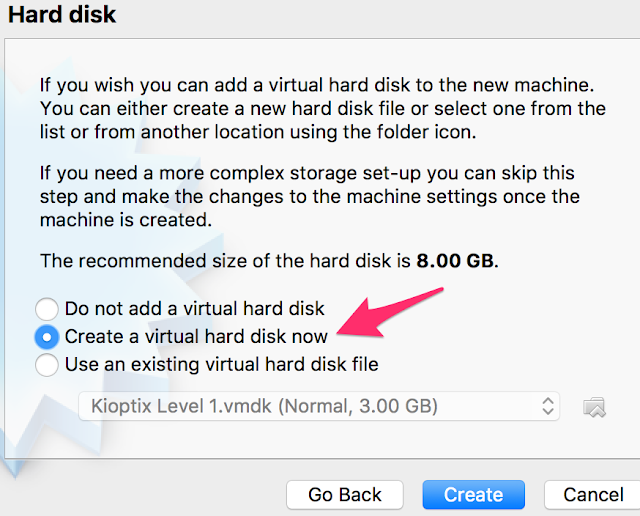
- Leave the default option of "VDI" and click "Continue"

- Leave the default option of "Dynamic" and click "Continue"

- Change the hard drive size to 30GB and click "Create"

- Click "Settings" for JuiceShop
- On the "General" tab, click "Advanced", and change both "Shared Clipboard" and "Drag n drop" to "Bidirectional"

- On the "System" tab, click "Processor", and increase the number of CPUs up to 2 if possible

- On the "Storage" tab, click "Empty" under "Controller: IDE", and click the CD icon

- Click "Choose Virtual Optical Disk File"
- Select the ISO from step 2
- Click Ok
- Click "Start" on the JuiceShop VM
- Press the up arrow to select "Install CentOS 7" and press Enter

- Once the GUI install screen appears, select the appropriate language and click "Continue"

- Let's start with configuring the system from the top. Click "Date & Time".
- Change the timezone as appropriate and click "Done"
- Click "Software Selection"
- Choose "GNOME Desktop", check "Development Tools", and click "Done"

- Click "Installation Destination"

- Review the disk options and click "Done" when complete

- Click "Network & Host Name"

- Click "Configure"

- Click "General"
- Check "Automatically connect..."
- Click "Save"
- The ethernet adapter should now have automatically flipped to "On"

- Click "Done"
- Click "Begin Installation"

- While the system begins installation, you get the option to set a root password and a user. Click "Root password".

- Set a root password and click "Done"
- Click "User creation"

- Set the full name, user name (should automatically populate), check the box for "Make this user administrator", and matching passwords. When done, click "Done".

- Wait for the installation process to finish
- Click "Reboot"

- Once you're back into the GUI configuration screen, click "License information"

- Review the EULA, check the box to accept the terms, and click "Done"

- Click "Finish configuration"

- Log into the system!

- In the gnome-initial-setup screen, choose your language and click "Next" in the upper right
- Review the keyboard selection and click "Next"
- Review the privacy option and click "Next"
- Connect accounts that'd you like and click "Skip" if you choose none of them
- Click "Start using CentOS Linux"

- Review the help information and close when finished
- Move the mouse cursor to the top left of the screen to "Applications"
- Click "Applications" and click on "Terminal"

- In Terminal, type in, "sudo yum update" and press Enter. Review the warning, enter your password, and press Enter.

- I had an issue with PackageKit locking yum in two different instances. Move the cursor to the top right of the screen, click the power icon, and click on the "Power button" icon.
- Click "Restart"
- Enter the password and click "Authenticate". The system will be rebooted.
- Log back in!
- Open up a Terminal client (Applications > Favorites > Terminal)
- Type in, "sudo yum update", press Enter, enter in your password, and press Enter
- A bunch of text will scroll by, eventually it'll stop asking if you want to download updates. Type in, "y" and press Enter.

- Next you may get a prompt to update a key. Type in "y" at the prompt and press Enter.

- Once that completes, move the mouse to the upper right, click on the power icon, and click the wrenches

- Click "Power"
- Click the dropdown for "Power Saving" and change it to "Never"

- Click the back button to go to the previous screen
- Click "Privacy"

- Click on "Screen Lock"

- Click on "On" to turn it off

- Click on the "x" to close out
- Click on the "x" to close out of Privacy
- We now want to install the VirtualBox Guest Additions. If you click out of the VM (pressing Right Control in Windows or Left Command in macOS), you get options for the VM if you click the title bar of the VM window. These instructions are based on Mac, so click on "Devices" at the top and select, "Insert Guest Additions CD image".
- In your VM, you should see a CD icon automatically popup and an auto-run box asking if you want to run the software. Click "Run".

- Enter in your password and click "Authenticate" or press Enter
- If all goes well, you'll be able to freely move your mouse in and out of the VM. Yay! Press the Enter key.

- We now need the Node.js package manager to run the Juice Shop. If we type in "npm" at the prompt, we see that it's not installed.

- We will refer to these official instructions from Node to install what we need
- In Terminal, type in, "curl --silent --location https://rpm.nodesource.com/setup_9.x | sudo bash -" and press Enter

- Enter in your password and it should do it's magic
- Like the instructions on the website and in the window, we need to now install node v9. We are using v9 since that is what is officially recommended by Juice Shop as the preferred version.

- In Terminal, type in, "sudo yum install -y nodejs" and press Enter
- It should complete pretty fast! We now have nodejs v9.5 installed at the time of this writing.

- Now we need to get the latest version of the OWASP Juice Shop. In our VM, go to Applications and open up Firefox.
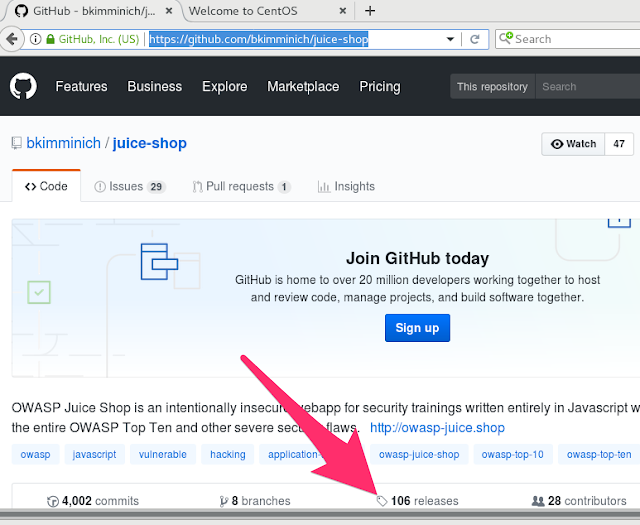
- In Firefox, browse to https://github.com/bkimminich/juice-shop
- You should see a "releases" link. At the time of this writing, there are 106 releases. Click on that.
- We want the latest linux, x64, node9 package. In this case, its juice-shop-6.4.2_node9_linux_x64.tgz. Click on that.

- Click on "Save File" and click "Ok"

- Once it's done, Firefox should show you a helpful mini-window and a folder icon so you can browse to where the file was saved. Click on the folder icon.

- Right click on the archived file and click "Open With Archive Manager"

- Click on "Extract"

- Click on the new folder icon

- Give the new folder some kind of meaningful name. I chose, "js642". After you enter in a name, click "Create"

- Click on "Extract"

- Click "Close"
- "X" out of the Archive Manager
- You can close the file browser window now too along with Firefox
- Go back to the Terminal window
- Browse to the folder we extracted the Juice Shop contents into

- Type in, "npm start" and press Enter. If all goes well, we should have the Juice Shop listening on port 3000!

- Open up Firefox, and browse to http://127.0.0.1:3000

- Welcome to the OWASP Juice Shop!


No comments:
Post a Comment